Thursday, August 30, 2012

Italian Sausage Meatballs and Spaghetti

Wow, time has flown by and I finally had some time to sit down and share a meal with ya'll!! It was one of those nights where we had some random items hanging around and the Italian came out in me full force with this one!! Spaghetti and meatballs is a favorite of mine. I love to throw in all sorts of yummies to make it a little less ordinary! So, I pulled the drawers out of the fridge and looked for things I needed to make fast before they went bad and realized I could make a mean spaghetti dinner! It was fabulous and everything was just hanging around our cabinets and fridge, so here is how I dressed it up.

I threw a package of spaghetti in a large pot and started that cooking, while Dee Jay started on the meatballs. We had a little over a pound of ground Italian sausage ready to be cooked so he mashed up the meat and threw in a couple handfuls of finely diced onion, and tossed in a little handful of oatmeal. I had a left-over jar of Ragu spaghetti sauce, so I tossed that on a back-burner and chopped the rest of the onion and tossed it in. I added a dash (shake the container once or twice) of oregano and parsley. Then found some red pepper flakes to add a kick to the sauce! When the spaghetti was done, I drained the water in the sink added a splash of red wine vinegar and about two tablespoons of butter. We tossed the sauce in with spaghetti and left it on the stove on low while the meatballs finished cooking!

When everything was ready to go I warmed up some garlic bread in the oven and served it up!! The meal saved an onion and a jar of sauce from meeting their doom! It's so easy to grab things around your kitchen and start cooking something regular and give it a little individual taste of your own! If you're out of ideas for cooking and about to throw a microwave meal in, look around and think to yourself what tastes good together and what could make an easy meal when you're at the end of your groceries!! You'll find you have enough food left to feed a family of 10 for a week if you really use your brain :) It's fun to cook like this, even though some people think it's scary or afraid they will just mess it up! You know what tastes good to you...So, I'm challenging you to try it out! It's fun to come up with a meal by yourself and we LOVED this! I could eat Italian food every single day, so it didn't take long to know what I wanted to do! If you get a good idea going, send them my way!! I love to hear what ya'll are cooking in your kitchens!! Stay tuned because I just made an incredible venison roast that will be added very soon!! Hunting season is almost upon us once again, and this girl could not be more excited to finally have some meat back in the freezer!!
Sprinkle some Parmesan cheese on top when you're ready to eat :)

~HAPPY EATING~


Sunday, August 12, 2012

Sunday Afternoons Make For Good Eating

So, Dee Jay, his brother and I went out fishing last night and got to see the beginning of this meteor shower that's going on! We caught one baby catfish (I did... thank you very much) and saw lots of beautiful meteors with their long and sparkly tails! Tonight is supposed to be the best chance to see them, so we're hoping the clouds stay away and we can get a great spot to fish and watch the stars! We didn't get back home until about 2:30-3:00 this morning so needless to say we crashed hard and woke up in time for lunch! I had made some shredded chicken in the crock-pot the other day, so I went to work on a little "brunch" for all of us, and then got in the baking mood and decided to make some cupcakes I have had my eye on for awhile now. Both were BIG winners, and the chicken that I thought we would never get through is almost gone now :) So let's start with the chicken and move on to the cupcakes to end our weekend! Here we go...

I got a text from my friend Amy who said she just cooked some shredded chicken for her and her hubby and that I had to try it! Well, we are so glad we did because we have loved it! You can find the original recipe on a blog titled Chocolate Therapy. Already, with a name like that you don't really feel anything can go wrong :) It is ridiculously simple to make and we let it simmer on low for almost 10 hours! By the time we got home this morning, we were starving and ready to eat a taco and crash, and then this morning I took the leftovers and made some breakfast burritos! Here are your ingredients...

1 jar of salsa (I used Pace-Hot)
1 envelope of taco seasoning
6 boneless, skinless chicken breasts

I told you it was easy. You literally are going to put all of this in your crock-pot, turn it on low and cook for at least 6 hours or high for 3-4. Last night, we added guacamole, sour cream, jalapenos, and shredded cheese for soft tacos. This morning I added sliced green onion, finely chopped white onion, one tomato, and half a jalapeno. I scrambled 7 eggs, and half-way through cooking them, I threw in all the yummies! Then we rolled them up burrito style with sour cream, shredded cheese, and a big spoonful of the chicken! It was heavenly!!

Now on to the cupcakes :) I got the "idea" of this recipe from Sweet P's Baking Co. blog. Now you can check out her version, and I will tell you mine! The ingredients I used were...

1 box of French Vanilla cake mix
1 cup of orange soda
1/2 cup of canola oil
3 eggs
1 container of Duncan Hines Frosting Creations Frosting Starter
1 envelope of Duncan Hines Flavor Mix powder-Cotton Candy

You are going to mix in a bowl the French Vanilla cake mix, 1/2 cup of canola oil and 3 eggs. After you have this well mixed, you are going to gradually add the one cup of orange soda! Stir or mix together well because the orange soda had a tendency to separate from the rest of the batter. Once we got everything mixed in, I spooned the mixture into cupcake liners and popped them in oven at 350 degrees for 17 minutes.
Right out of the oven :)
 
Now while these are cooling, you are going to follow the directions on the frosting creations. You are going to stick a knife in the middle of the frosting causing it to form a "hole". Then dump the envelope of flavoring into the frosting hole and mix together! Now you will have a delicious blue frosting that the taste of alone will bring you back to your childhood days of eating cotton candy at the fair! I spread the frosting on the cupcakes once they were cool and added some sprinkles for decoration! The boys tried them and fell in love! I have a feeling these won't last long either in our home! 
I am not a professional when it comes to decorating...But I'm going to work on it :)

The combination of the orange soda, vanilla and cotton candy frosting makes a really delicious combination that you must try! Add your own decorations and send me pictures because I want to see them to drool over once these bad boys are gone!

~Happy Eating~

Here are both links again! I hope you all had a fantastic weekend!


Saturday, August 11, 2012

Ziti for 20 (or close)

So, have you ever read a recipe and started cooking only to find that either a) you went wrong somewhere or b) the person who originally cooked the recipe studied at Hogwarts school of magic and "somehow" made it work? Well, I'm not really sure which is the case here but let me tell you, I just made the BIGGEST casserole of my life! It's a good thing I had DJ and his brother, Craig here to help me tackle this beast! We still have leftovers, but we are down to only a square or two! YAY!! This is a super delicious and a very easy dish to make (and still tastes great as leftovers)! Before I start, I want to tell you that the recipe called for a 9x13 pan. I am here to tell you a 20x20 might have been easier and a lot less messy!! I had to place a big cookie sheet under the casserole dish just to keep the oven rack from bending haha!!! So, you can find the original recipe here on a very wonderful blog titled The Girl Who Ate Everything. She has some really great recipes and I can't wait to try more of them very soon! I will say she did note also that it makes a "heaping" 9x13 casserole, but her picture is so pretty! When we tried to maneuver ours out of the pan it was only pure luck we got it out in kind of one piece! So here we go...get ready to EAT!!!

Here are the ingredients you will need:
1 lb Ziti pasta
1 onion, chopped
1 lb. Italian Sausage
2 ts minced garlic
2 ts Italian seasoning
2 jars (26 oz EACH) spaghetti sauce--I used Ragu's Roasted garlic and Six Cheese
6 oz Provolone cheese, sliced (9 rounds)
1 1/2 cups sour cream
8 oz Mozzarella cheese
Grated Parmesan

First, you're going to want to get the pasta boiling in some salt water. Cook as the package directs!

While the pasta is cooking get out your large skillet and brown the onion and sausage over medium/high heat. Add minced garlic and cook for another minute. Then add the spaghetti sauce and Italian seasoning and simmer for 15 minutes.
Pre-heat your oven to 350 degrees and butter your 9x13 pan (get ready to work some magic here)!!
Layer:
1/2 cooked Ziti
1/2 sauce/meat mixture
Provolone cheese slices
Sour Cream
Remaining Ziti
Remaining Sauce
Mozzerella
Then top it off with Parmesan cheese

Bake this for 30 minutes (20 minutes covered with foil and 10 without)

Note: You might want to add an extra pan to the bottom if you have spills...and get napkins nearby to clean up after the spillage you will probably get as you try to get it all to fit in the pan :)

DELICIOUS!! 

~Happy Eating~


Thursday, August 9, 2012

A little taste of the Orient

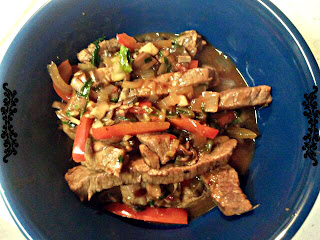
Is everyone as excited as I am about the return of Fall weather? I love the Fall...the smell, the world changing colors, the football games, the World Series baseball games, and definitely the cooking! Making dips and chili for Sooner football games, and warm, hearty foods to ease into the return of colder weather (hopefully)!! This recipe I made reminded me of Fall. It was warm, delicious, hearty, colorful, and would be divine with some lo mein noodles. We ate it as is, no rice and no noodles and it was absolutely wonderful! Next time, I will definitely "beef" it up with some noodles to make a exquisite dinner! So here is how you're going to cook up this delightful piece of the Orient...

For starters, I found this recipe on myRecipes (it can also be found on my Pinterest). It is full of colorful and tasty ingredients, so let's get started!

Here are the ingredients you're going to need:
2 TB ginger
1 TB minced garlic
3 TB low-sodium soy sauce
4 ts cornstarch, divided
1 ts sesame oil
1/2 ts red pepper flakes
1 pound of flank steak thinly sliced (I used tri-trip and cut it up into slices...it still worked and didn't break the bank)
Cooking spray
2 cups thinly sliced mushrooms- Shiitake
1 cup vertically sliced onion
1 cup red bell pepper strips
4 cups Bok Choy sliced/chopped
1 cup beef broth

First (about an hour or so before you're actually ready to cook) you are going to marinade your steak. I actually kept it in the fridge for 3 or 4 hours, just as long as it is in there for at least 20-30 minutes. You are going to combine the ginger, garlic, soy sauce, 2 ts of cornstarch, sesame oil, and crushed red pepper in a large Ziploc bag. Add your steak, seal the bag and pop it in the fridge.

When you are finally ready to get going, you are going to coat a large skillet with cooking spray and warm the pan over med-high heat. Add your mushroom, onion, and bell peppers. Cook about 3 minutes, then remove and transfer the vegetables to a bowl. Add the bok choy to the pan and saute until it is wilted (only takes a couple of minutes). Then, add the bok choy to the bowl of vegetables! 
Now you are going to re-coat your skillet with cooking spray and add half of you steak mixture. Cook about 3 minutes until the steak is browned (I actually had to turn up the heat just a tad). Remove the steak to the bowl, then repeat the process (coat pan--add steak--brown steak--place in bowl).
Now in small bowl, you are going whisk together the broth and remaining 2 tsp of cornstarch. Add this mixture to the pan and scrape the bottom of the pan to loosen the browned bits stuck to the skillet. Bring broth to boil and return your bowl of goodies to the skillet.
Toss this all together (gently) to coat everything with the "gravy". Take your skillet off the heat, make noodles or rice if you wish, and serve! It is delicious and packed with lots of goodies like greens, peppers, and mushrooms!!
This truly is a wonderful dish, and if you add noodles or rice, let me know how it turns out!! I get a lot of feedback from you all about what you like! Don't forget either that we are on Facebook!! Be sure to "like" the page so you can see when new recipes have been added!

Here is the link to the actual recipe again...RECIPE

~Happy Eating~

Here is my funny photo I found this week that I had to share with ya'll!! Keep your head up...Tomorrow is Friday!!

 Photo courtesy of http://www.mopo.ca


Tuesday, August 7, 2012

Penne tossed with Roasted Asparagus and Balsamic Butter

So, I have discovered that there is a website for pretty much everything under the sun! Including a entire website dedicated to asparagus. It's really very funny that inanimate objects can have their own site, which makes me picture a spear of asparagus sitting behind a computer telling the world one line at a time how delicious and nutritious it is! Anything and everything you would really want to know about asparagus can be found at MAAB (Michigan Asparagus Advisory Board). I won't go on and on about it, but if you don't have time or happen to miss farmers markets in the Tulsa Area, there is a new store which opened in Jenks (official grand opening this Saturday, August 11) called Green Acres Market. You should really go and drool over their fresh produce and delicious deli! With all this being said, my recipe to share is Penne pasta with roasted asparagus and balsamic butter. Now, a note before cooking up this very refreshing, unique tasting dish is that it calls for a whole stick of butter. I however (along with a lot of the people who commented) did not use the entire stick. You can also substitute the asparagus for broccoli or squash (already tried it...it's also delicious)! So let's get cooking...

Get your oven heating to 400 degrees and get ready for a very easy meal! Snap one pound of asparagus into one inch pieces. Place them on a baking sheet and toss with one tablespoon of olive oil, 1/4 of a teaspoon of salt and 1/2 of a teaspoon of pepper.  Place them in the oven and cook for ten minutes. In a small sauce pan simmer a half of a cup of balsamic vinegar (get ready for the whole place to smell like the vinegar). You will simmer the vinegar until 3 tablespoons remain. Stir in one half teaspoon of brown sugar (I actually used a little more), and a dash of pepper. Remove the pan from the heat. In another pot, cook the Penne as the package instructs, drain and toss with about one stick of butter, the vinegar, the asparagus and 1/3 cup of Parmesan cheese. Presto!! It's a very delicious meal with very little work, and trust me it is hard to stop yourself from eating bowl after bowl until you're licking the very last of the sauce off your plate!

I did not get any pictures this time :( My camera was malfunctioning! However the site you can find this recipe on is Food and Wine and here is the run down....

Penne with Roasted Asparagus
1 pound asparagus 
1 tablespoon olive oil 
2 teaspoons salt 
1/2 teaspoon fresh-ground black pepper 
1/2 cup plus 
2 tablespoons balsamic vinegar 
1/2 teaspoon brown sugar 
1 pound penne 
1/4 pound butter, cut into pieces 
1/3 cup grated Parmesan cheese, plus more for serving 

~Happy Cooking~

Friday, August 3, 2012

Venison (or beef) Stuffed Peppers

Sadly, I have come to the end of ground venison from last hunting season. This is one of the last recipes I was able to pull off with what we had in the freezer! Good thing hunting season is just around the corner! So I pulled this off a friend's Pinterest site and went to work! You know it's good when your man takes one bite and looks up to say, "You can feel free to make this anytime you want". I totally agree!! The thing about cooking with venison vs. cooking with beef is no matter how "lean" you buy the beef, you still always get grease! When I popped these in the crock-pot, there was almost no grease at all which made the peppers very yummy and not soggy. If you make it with beef, let me know how it turns out! We wondered where all the grease would go. Here is how to fix up these delicious peppers...


First you are going to start with 4 bell peppers. (Any color will do...I used red, green and orange). Cut off the tops of the peppers and remove the stem and seeds. Save the tops because you're going to want to dice them up to throw back in! Dice half of a yellow onion, then pour one cup of enchilada sauce over the onion in a bowl and microwave for about 5 minutes. Pour 1/3 cup of water into the bottom of your crock-pot, then nestle the bell peppers in. In a large bowl you are going to combine one pound of meat, the sauce and onion mixture, the chopped up bell pepper tops, one cup of shredded cheese, 3/4 cup of cooked rice, one and half teaspoons of salt and a half of a teaspoon of pepper. Now spoon mixture into the the peppers and top it off with more shredded cheese. Cook these yummy peppers on low for 6 hours (I actually didn't have six hours so I cooked mine on high for about 4 hours). Remove them from the crock-pot and eat up! I served it up with some homemade guacamole and chips and they were a hit!
Happy Green Pepper on a Plate
You can find the original recipe on a cute little blog titled no. 2 pencil 
Here is the run down:

4 bell peppers
1 pound of 85 percent lean ground beef

1/2 of a yellow onion, diced

1 cup of canned enchilada sauce

1 1/4 cup of shredded jack cheese

3/4 cup of cooked Mexican rice

salt and pepper

sour cream and diced green onion for toppings
Finely dice the onion place in a bowl and cover it with enchilada sauce. Heat in the microwave for 5 minutes.
Cut off the tops of the peppers and remove the stem and seeds. Finely dice the tops of the peppers and place in large bowl.
Pour 1/3 cup of water into the bottom of your crock-pot and nestle the bell peppers in (It might be a tight fit...it's okay)!
In the bowl with your chopped pepper tops add, meat, sauce and onions, 1 cup of shredded cheese, 3/4 cup of Mxican rice (cooked), 1 1/2 teaspoon of salt, and 1/2 teaspoon of pepper.
Fill peppers and cook on low for 6 hour. Top them with sour cream and green onions and enjoy!
~Happy Eating~ 

Also, if you have a hunter in the family as well and haven't discovered Game and Garden you really need to head on over to Stacy's blog and check it out! We saw her the other day on the outdoor channel and I immediately went out and looked up all the recipes I could find by her, and put her cookbooks (she is releasing a new one) on my WANT list :) She has some great ideas!! I can't wait to try more of her venison recipes once hunting season starts back up and we get more venison! We are getting ready to try one of her fish recipes...check back soon to find out how it turned out!